On January 5, 2021, OpenAI revealed DALL-E,
an artificial intelligence program that creates images from textual descriptions, on January 5, 2021. It uses a
12-billion parameter training version of the GPT-3 transformer model to interpret the natural language inputs and
generate corresponding images.
Since the initial private beta release, access to DALL-E was limited to those on a waitlist. However, about a month
back, on September 28, 2022, DALL-E 2 opened to the public, and the waitlist requirement was lifted. Over the past
month, millions of users have explored DALL-E's capabilities using https://labs.openai.com/.
DALL·E joins GPT-3, Embeddings, and Codex in our API platform, adding a new building block that developers
can use to create novel experiences and applications. All API customers can use the DALL·E API today.
As soon as I heard the news, I couldn't help but immediately explore the API myself. I was already
familiar with OpenAI's API playground for text-based AI prompts and had an existing API key ready.
My first instinct to consume the DALL-E API was to use plain old Windows PowerShell 🤓
"A photorealistic close-up of a variety of river
rocks"
"A super cute puppy"
So dope 😎 - and wildly simple!
DALL-E OpenAI Image Generator for Sitecore
AI-generated images were featured prominently in
Paige O'Neill's keynote at the 2022 Sitecore Symposium in Chicago.
There's real value in this technology. A reality where designers, marketers, and developers who need a
patterned backdrop can unleash their creativity to quickly and easily generate an image without needing to
license stock images is nearly here. Even in its current state, the ease and simplicity of the DALL-E API
make this the perfect candidate for consuming in a CMS.
With the fresh release of the DALL-E API, I couldn't think of a better time to give it a whirl and
integrate it into Sitecore.
Naturally, Sitecore PowerShell Extensions was the way to go. The 'Context Menu' and 'Insert Item'
integration points allow users to open the prompt while targetting any 'Media Folder' - either by
right-clicking, expanding Insert, and selecting 'DALL-E OpenAI Image Generator' or selecting
'DALL-E OpenAI Image Generator' from the Folder tab of the active Media Folder.
Both integration points are configured out-of-the-box to only show on items where the Template is a 'Media
Folder.'
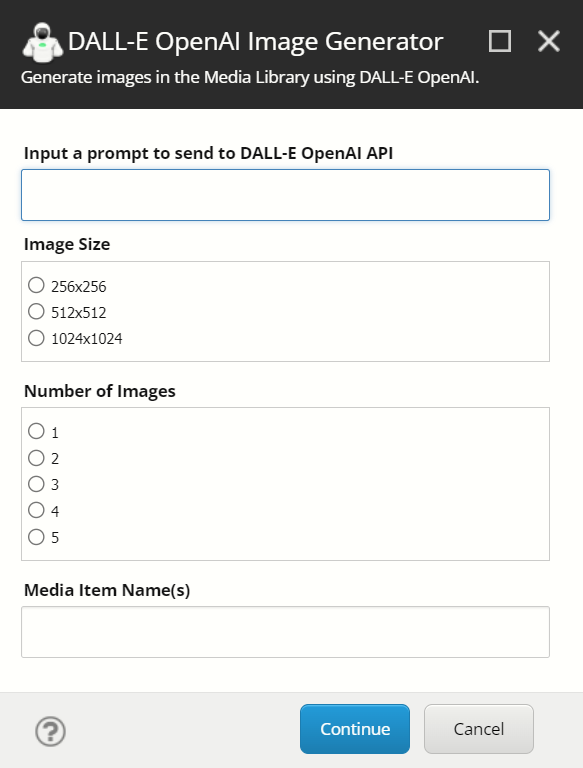
Once the prompt is toggled, the user can configure their call to the DALL-E API using the following inputs:
The number of images to generate (DALL-E API allows an
integer from 0 to 10. The module limits generation to up to 5)
The base name for new Media Items created in the Media
Library after images are generated from DALL-E.
The module also comes bundled with a Settings item located in the following location:
/sitecore/system/Modules/PowerShell/Script Library/DALL-E OpenAI Image Generator/OpenAI API Settings
{F102AE0D-6A5B-499B-9500-505D0E6F686F}
This item allows users to change or override some default settings - the most important being the 'OpenAI API
Key' field, where users must populate their unique API key. after installing the module, You can
generate an OpenAI API Key by logging in and navigating to the API Keys settings for your account: https://beta.openai.com/account/api-keys
The Setting item's Template is located in the following location:
The module is totally open to any community contributions or general suggestions. Beyond that, feel
free to fork a version of your own a build on top of it.
Final Thoughts
I'm really excited about this space and where I believe it's headed. As this technology continues to grow,
we should expect an expansion of the DALL-E API (and others) that will almost certainly redefine how we work
with digital visual assets.
I managed to snag a category win for the 2021 Sitecore Hackathon! 😅
This year, I unexpectedly flew solo as my team members could not attend (both
due to completely understandable reasons). Luckily for me, one of this
year's categories, in particular, made me feel like I stood a chance: "Best use of Sitecore PowerShell Extensions
to help Content Authors and
Marketers."
YES. YES YES 1000x YES.
Knowing that I needed to
land on something fairly quickly to complete all submission requirements (a
completed module with clean code, reliable installation instructions, a
well-documented README.md, and a video) my evening began with a brainstorming session listing all possible routes I could take for the next 24 hours.
I actually landed on a similar concept I posted about a couple of years back;
interacting with
Microsoft's
Cognitive Services
using PowerShell,
then focusing
on content translation. I knew Microsoft had continued to update their API offerings since that
post, so I started digging into what was new. I stumbled upon
the Sentiment Analytics API, which seemed like an excellent use case that
could satisfy the 'help
Content Authors and marketers' category requirement.
By providing the right combination of SPE user interactivity (modal dialogs,
accessibility of the utility in the Ribbon, etc.), I could build a utility
that analyzes content from a given field and provide a sentence-by-sentence
breakdown of the content's sentiment score using AI.
After playing
around with the example APIs in the browser, I decided to create my
Text Analytics Cognitive Service in Azure, grab my API keys, and fiddle around with the API
further in PostMan. At that point,
I felt pretty confident that I could integrate this with SPE. 🤞
The Sentiment Analyzer would
Analyze the sentiment of field content directly in Sitecore.
Give Content Authors the ability to run an analysis of a given field's
content, which returns an overall sentiment score and a sentence-by-sentence
breakdown of each sentence's sentiment score and corresponding confidence
scores.
The results are displayed using a Show-Result modal and rendered in an
easy-to-digest format.
I built the user dialog, wrote code that generated the appropriate POST data to be passed to the sentiment API endpoint, built the functions to render the data (using emojis, of course 👩🚀), configured a new Sitecore template and the corresponding item for API key storage then tied it all together into an SPE module that exposed the tool from the right-clicked Context Menu,
and from the Ribbon.
As midnight approached, I felt that I was in decent enough shape
with the Sentiment Analysis script, I could begin exploring using another API in the same Text Analytics product group. I moved forward with a second tool
utilizing the API's keyphrase extraction feature
without a tremendous amount of overhead; mostly endpoint changes, JSON
parsing, and data rendering differences.
The Keyword Analyzer would:
Analyze a field's content to extract critical keywords/phrases.
Give Content Authors the ability to analyze a given field's content which returns a list of extracted keywords that can then be used to manually populate a meta keywords field.
The results are displayed using a Show-Result modal and rendered in an
easy-to-copy format.
I got started, but a couple hours later...
Okay, it's ~2:30 AM. I'm going to sleep.
#SCHackathon
I'm awake after a few hours of sleep and briefly back to review the ~300
lines of PowerShell I wrote yesterday for
#SCHackathon. Both my
kids seem to have woken up with colds so my priorities may need
to shift today. 🤧
I spent most of the day (alongside juggling sick-kids priorities) polishing
the scripts I had so far; resolving logic issues, error prevention, adding
code comments, and overall meticulous code clean-up.
Eventually, I
had a functional set of utilities.
Buttons in the Ribbon configured in the SPE module.
Dialog when clicking either utility against an item with a
Single-Line, Multi-Line, or Rich Text field.
Sample output of sentiment analysis
Sample output of keyword analysis
I made sure to stop by for a late morning Coffee Break. ☕
Shout out to the #SCHackathon warriors who joined us for Coffee Break. Special big up @GabeStreza who stepped up to fly solo!
I built the final structure of the SPE module using the Module Wizard 🧙♂️ to configure my integration points. The module also stores the API Settings item, so swapping in an API key would be seamless for anyone who installs the module.
⚡ The module looked like this in the tree:
I spent the final hours of the event packaging the module/testing the installation steps before working on multiple documentation phases (using Markdown for absolutely everything in 2020 was really coming in handy).
It wasn't long before a mid-afternoon Twitter update:
The video production was probably one of the most challenging parts of this experience. After writing a short-handed verbal script, I tried to record the entire demo in a single recording. I used OBS Studio to record and the built-in Video Editor in Windows for post-production. I even squeezed some personal music snippets I composed some time ago without risking Copywrite strikes on YouTube. 😂
The video submission can be viewed here:
By around 5 PM, I was done and had submitted my entry 🚀
The full Github submission can be found here, including the full source code for both scripts, the module ZIP for installation, and installation steps.
Take it for a spin if you care to! 🤹♂️
I'm really humbled and proud to have been a part of the winner's circle this year. Another big shout-out to the folks who run and judge the event, as well as a big congratulations to the other category winners!
Have you noticed that the Screenshots button has been removed in 9.3?
I guess it's not that surprising since I don't remember any point in time where it actually functioned.
It's always gone something like this;
Click the Screenshots button:
The Screenshots button. So familiar yet so foreign to me
Get a message stating you need to purchase the "relevant service".
Click Open
I never pass up a chance to open the Sitecore App Center
App Center Opens. No one profits. Ever.
Great.
You may be asking, why don't the content authors just use an extension or some other tool?
Or, you know, the built-in capabilities of any Chromium-based browser.
🤷♂️
The request called for consistent, full-page screenshot capabilities in Sitecore.
I thought that seemed pretty do-able.
Ever hear of ScreenshotLayer?
What's ScreenshotLayer?
It's a highly reliable REST API service that produces screenshots.
Screenshotlayer is a lightweight REST API built to deliver high quality PNG, JPEG & GIF website screenshots at unparalleled speeds and through a simple interface.
While I was researching and proving this out, I found that using open source libraries like Freezer often returned inconsistent results. I landed on ScreenshotsLayer given the ease of integration. Basically; feed it a URL and some parameters, and you get a high-quality screenshot back.
The service is free up to 100 screenshots per month, with a reasonably priced subscription model otherwise. https://screenshotlayer.com/product
Limitations
- CM needs to be accessible on the web without IP restrictions for API to consume. This won't work locally.
- Added cost: Depending on the number of screenshots taken per month, you'll hit the free 100 screenshots quick. A Basic Plan subscription - which accounts for 10,000 screenshots per month should suffice in most cases.
This doesn't seem out of the ordinary considering there used to be a service you'd have to sign-up for any way.
Goal
Our goal is to add a new Content Editor Ribbon button called 'Screenshots' in the same location that the old button once sat. If you're running Sitecore 9.2 or below, you'll want to manually remove or deny read access to the existing Screenshots button in the Core database.
The Script
The script should initially get the selected item, assert that the item has a layout, and get the item's URL. (The Get-ItemUrl function may need to be customized further for your own needs)
User Input
Let's assume a content author should make a simple selection for their screenshot; Mobile or Desktop. We can show a simple dialog with two buttons; Mobile or Desktop.
Simple, yet effective.
Upon selecting Mobile, we'll simply set a variable. If we have a Page URL, we'll call our Get-Screenshot function and pass in the URL and screenshot size as parameters:
Preparing the API Query
The API expects some common parameters defined in the URL query parameters, specifically, the API key, page URL, and viewport. We can concatenate all of our options and append it to the API URL endpoint.
Consuming the API
We can now execute a WebRequest to the API and cast our result to an image stream.
Saving and Downloading the Image
With an image in the memory stream, we'll need to temporarily store the image as a physical file on the file system. In our approach, we'll utilize the $SitecoreDataFolder variable and create a 'screenshots' folder within it. We'll build some conditions to check for the presence of this location. Once the image has been saved, we'll invoke the Download-File function
Putting it All Together
SPE Integration
Creating a New Module
Right-click on the Script Library folder and select Module Wizard
We'll name our module Screenshots and select Content Editor - Ribbon as our integration point:
You'll end up with a new module folder and several items:
We'll want to delete all folders in this new module except for the Content Editor > Ribbon > Presentation > Preview. We can add a new PowerShell Script item under the Preview folder:
First thing's first....set an icon in the appearance section (you know about sitecoreicons.com, right? 😉)
Now, let's make sure from an integration standpoint, the Screenshots button is only displayed for items with a Layout present. We can easily accommodate this by editing the Show Rule in the Interactive section:
The Rules Engine makes this a no-brainer
Finally, we can add our script to the Script body field of our item. Now would be a good time to make sure the $apiKey variable has been customized before saving.
Activating the New Module
In order for the system to pick up our new module and its corresponding integration points, we need to Sync the library. This can be achieved by opening a new ISE session and selecting the Sync Library Content Editor Ribbon sub-option of the Rebuild All button under the Settings tab:
We should now have a Screenshots button that displays in the Presentation > Preview chunk of the ribbon whenever an item with a layout is activated.
wo0t!
Final Result
Starter Package
If you're looking to use or expand this functionality to fit your own requirements, you can feel free to download and install the Sitecore package from: https://github.com/strezag/Sitecore.SPE.Screenshots
Microsoft Cognitive Services is an impressive set of powerful, easy to integrate APIs for developers. With AI at its core, Cognitive Services
strives to solve business problems using Vision, Speech, Knowledge, Search, and Language service offerings. Recently announced, it's now easier than ever to start using Cognitive Services with a simplified key mechanism.
Creating a Cognitive Service in Azure itself is dead simple. It take less than 5 minutes to spin up a Cognitive Service resource and you're ready to develop. The above video will help get you started.☝
So, what can we do with these services in Sitecore?
These are really great adaptations of these APIs, but I wanted to explore these services myself.
Translator Text API
The Translator Text API is easy to integrate in your applications, websites, tools, and solutions. It allows you to add multi-language user experiences in more than 60 languages, and can be used on any hardware platform with any operating system for text-to-text language translation.
The Translator Text API is part of the Azure Cognitive Services API collection of machine learning and AI algorithms in the cloud, and is readily consumable in your development projects.
Being completely obsessed with PowerShell, I figured I'd give it a go. For my demo, I want to allow content authors to right-click on a Sitecore item, select a Translate Text Fields PowerShell script, configure some option in a dialog and click Continue.
The script should create a new language version in the target language selected and translate all text fields selected.
Pricing
Before starting, it should be noted that the Free tier for translations is 2 million characters per month.
Since we're keeping this integration simple, it's not likely we'll hit the limit.
Let's Script It
Building the dialog is pretty straightforward. Get the context item, grab the applicable languages and fields (Single-Line and Multi-Line only for simplicity and API restriction avoidance), and set the dialog options:
We'll need a function that we can call to process the item after obtaining the selections from the dialog. We expect to call it like this:
The function should issue an authentication token from the Cognitive Service, generate a new language version for the item in the target language, and call another function to translate the original field value to the target language:
The Issue-CognitiveApiToken in the above function issues the authentication token we need to send with our request to the translation API.
We can send a request to the translation API with the issued token in a new function that will be responsible for processing the actual translation:
Putting It All Together
Now that we've got commands to interact with the Translation API, we can build out the contextual PowerShell script to provide some options for our content author.
Adding this script to one of the Context Menu (PowerShell Script Library) folders (eg. /sitecore/system/Modules/PowerShell/Script Library/SPE/Core/Platform/Content Editor/Context Menu) will allow the script to be executed contextually.
Final Result
I can see this being a good use-case for Dictionary items specifically as there are some restrictions for content length size that the API will reject. However, this is simply a demo of what is possible here (definitely not production-ready 🤪).
Feel free to take and use any part of the script here and build something cool!
Sitecore's Item Web API is extremely useful is so many ways - however as your database grows, you may encounter a limit on the size of the response Sitecore is able to return.
After installing the Sitecore Item Web API feature to an existing Sitecore v6.6 site, I encountered an error when querying a huge part of the content tree using the following request: /-/item/v1/?sc_database=master&scope=s&query=/sitecore/content//*
Due to the sheer amount of data the request attempted to retrieve, I received the following response:
"Error during serialization or deserialization using the JSON JavaScriptSerializer. The length of the string exceeds the value set on the maxJsonLength property." I initially figured the solution would be as simple as setting the MaxJsonLength property in the web.config, but soon realized that this setting had no real positive effect.
DISCOVERY
At this point, I took it in upon myself to decompile/reflect the Sitecore.ItemWebApi.dll in hopes of overriding the serialization method in order to set the MaxJsonLength property when initializing the JavaScriptSerializer. After some digging, I discovered two relevant methods I needed to override:
JsonSerializer
SerializeResponse
The SerializeResponse method serializes the API's response using JsonSerializer.Serialize to return the response in JSON format.
The Sitecore.ItemWebApi.config patch file defines the SerializeResponse pipeline:
SOLUTION
I started a new Website Project in Visual Studio, then
Added the /App_Config/Include/zzz/ folders
Copied over relevant binary files into a /References folder
Sitecore.ItemWebApi.dll
Sitecore.Kernel.dll (for Sitecore 6.6 - use your site's specific version*)
Newtonsoft.Json.dll (v3.5 for Sitecore 6.6 - use your site's specific version*)
And added an Override folder to house the overriding code:
To override the existing Sitecore.ItemWebApi.Pipelines.Request.SerializeResponse definition, I created a patch file called zWebItemApiSerializedResponse.config and added it to the /App_Config/Include/zzz/ folder:
In the Override folder, I created two class files based on the decompiled Sitecore.ItemWebApi.dll code:
SerializerOverride - inherits ISerializer
 using System;
 using System.Web.Script.Serialization;
 using Newtonsoft.Json;
 using Sitecore.Diagnostics;
 using Sitecore.ItemWebApi.Serialization;
 using Formatting = System.Xml.Formatting;
 namespace Sitecore.SharedSource.ItemWebApiCustom.Override
 {
   public class SerializerOverride : ISerializer
   {
     public string Serialize(object value)
     {
       Assert.ArgumentNotNull(value, "value");
       var serializer = new JavaScriptSerializer {MaxJsonLength = Int32.MaxValue};
       dynamic parsedJson = JsonConvert.DeserializeObject(serializer.Serialize(value));
       return JsonConvert.SerializeObject(parsedJson, (Newtonsoft.Json.Formatting) Formatting.Indented);
     }
     public string SerializedDataMediaType => "application/json";
   }
 }
 using Sitecore.Diagnostics;
 using Sitecore.ItemWebApi.Pipelines.Request;
 namespace Sitecore.SharedSource.ItemWebApiCustom.Override
 {
   public class SerializeResponseOverride : SerializeResponse
   {
     public override void Process(RequestArgs arguments)
     {
       Assert.ArgumentNotNull(arguments, "arguments");
       SerializerOverride serializer = new SerializerOverride();
       arguments.ResponseText = serializer.Serialize(arguments.Result);
     }
   }
 }
Once this project successfully built, I copied over the new App_Config file, and the projects Sitecore.SharedSource.ItemWebApiCustom.dll file to my solution's /bin folder (add the .pdb file to the /bin folder if you want to debug!)
RESULT
You can confirm your patch file is properly overriding the original SerializeResponse pipeline using /sitecore/admin/showconfig.aspx and searching for SerializeResponse on the page. If everything went well, you can refresh the API call to see that the JSON response size restriction has been lifted!
Let me know in the comments if you have any suggestions or issues with this approach.
Also feel free to drop a line if this post has helped you out!
9x Sitecore Technology MVP 🏆 National Practice Lead + Sr Solutions Architect @ Genpact Experience 💻, Dad x3👨👩👧👦, Drummer 🥁, Tech junky 👨🏻💻 All views posted here are my own.


 Sitecore's Item Web API is extremely useful is so many ways - however as your database grows, you may encounter a limit on the size of the response Sitecore is able to return.


