Earlier this year, I built SPExAI Report Builder during the 2025 Sitecore Hackathon, a natural language interface for generating Sitecore PowerShell Extensions (SPE) reports. The concept was simple: use plain English to get real, working scripts. The result? A winning module that turned heads and saved hours. 🙌
But what if your team loves the idea but doesn’t have the time, access, or appetite to install a custom module? Perhaps you just need a script now and then. Or maybe you're working in an environment with limited Sitecore customization privileges.
It would be great if you didn't need to rely on installing a module into your Sitecore instance to benefit from this technology.
✨ Introducing SPExAI GPT
Introducing a new flavor of SPExAI; not as a Sitecore module, but as a custom GPT. It works entirely outside of Sitecore. No installs. No packages. No patch configs. Just a prompt box and your imagination.
Your prompt:
"Report of all templates (ID, Name, Path) and their usage count."
And SPExAI (the GPT version) responds with a fully working script. Same quality, same intelligence, now universally accessible.
Simply copy the output, paste it into the Sitecore PowerShell ISE, and run it:
Results!
One benefit you get with the SPExAI GPT over the SPExAI module is that you can continue your chat, which isn't available in v1 of the SPExAI (it's all one-shot), allowing you to prompt beyond your initial prompt. This is great for getting help with fixing errors you may encounter when using the initially generated script, or even for enhancing an existing script.
🧠 Under the Hood
The GPT version builds on the same core ideas as the Hackathon module:
🔍 A system prompt trained to interpret natural-language Sitecore requests and produce accurate PowerShell reports.
📚 A curated knowledgebase of common SPE scripting patterns tailored to tasks like item audits, rendering usage, field value searches, and more.
⚙️ Designed to speak "Sitecore" fluently, not just ChatGPT syntax, but the nuances of $SitecoreContext, $item.Paths.FullPath, Get-Item, and all the other familiar constructs.
I've adapted the system prompt to better align with ChatGPT’s structure, ensuring cleaner completions, improved formatting, and fewer hallucinations.
🚀 Try It Yourself
If you're looking to generate SPE scripts without touching your Sitecore instance, this GPT-based version might be the way to go. Whether you're prototyping, documenting, or training a team, it removes friction and delivers fast results.
You can find the SPExAI GPT on the Chat GPT store by selecting GPTs in the left-hand panel of ChatGPT, then searching for `spexai`:
You can also access SPExAI GPT directly using this link:
I'm super proud of this accomplishment, given that I was pushing into delirium territory near the end of the event, having been up for 32 hours straight and all...running on mostly
caffeine
and adrenaline to get it done.
Here's a snapshot of my real-time X updates throughout the event:
Sitecore Hackathon?
It's a virtual community-driven event where teams worldwide (52 teams across 13
countries this year) compete to build the most impactful Sitecore module given a set of categories (e.g., "Best
use of AI" or "Best tool for XM Cloud") within a strict 24-hour timeframe.
Typically, the event is held in
late February / early March, with teams registering roughly 4-6 weeks in advance. Submissions are then judged by a
panel of long-time Sitecore MVPs and community members who review each completed entry, test the functionality, and
collectively pick a winner.
Submission Requirements are clearly laid out in the GitHub repository to which each team is assigned:
Winner Benefits
🗣 Name recognition across Sitecore's official channels; the winning team is announced officially at SUGCON Europe and highlighted in the MVP
community.
🛒 $150 Amazon Gift Card (per team member)
🏆 A customized Hackathon trophy
My Past Hackathons
Wasn't my first rodeo! 🤠 Here's a rundown of my
past Sitecore Hackathon participations:
But I still used the hackathon timeframe to build sitecoreicons.com during the Hackathon window (which is still used by Sitecore developers
across the globe, 7 years later!)
I've barely played, but I liked the play-on-words when I came up with it).
I kinda love that I'm a 2x Sitecore Hackathon winner now 😅
The Idea
This year, instead of multiple categories (and multiple winners), the organizer's idea prompt was simply:
"Free for all — you can create your own idea for the Hackathon solution. Show us what
you got!"
It was a huge opportunity to build without barriers, with one winning team to take it all. I've been waiting for an opportunity to bring this idea
I've been mulling over in my head for months to life, and this was it.
Problem Statement
The biggest hurdle for analyzing content and creating
reports in Sitecore PowerShell Extensions (SPE) has always been the technical skill needed (PowerShell
scripting/syntax + SPE-specific
commandlets).
You'd need to train up;
learn how to query items using Get-Item and Get-ChildItem commands, declare an array object to store
results, utilize for loops and if conditions, etc.
And if PowerShell scripting isn't your thing, well...
In the age of generative AI though, this technical skills barrier can be dramatically lifted for non-technical
Sitecore
authors and admin, and/or drastically reduce the turnaround time for developers tasked with writing custom
PowerShell reports.
Enter: SPExAI Report Builder
What is it?
SPExAI Report Builder is an installable Sitecore PowerShell Extensions module that allows users to describe their
Sitecore report in
natural language, which in turn generates a complete and reusable SPE script:
🧠💻 Type your prompt
📜💾 Generate a PowerShell script and save it
🛠️🚀 Run it or modify it
"SPExAI" stands for Sitecore PowerShell Extension x Artificial Intelligence, which combines the power of SPE with modern LLM tech.
Compatibility
SPExAI Report Builder works with Sitecore 10.x or later. I tested on Sitecore 10.0, 10.3, and 10.4 during the event, but I'm pretty confident that it would also work with other versions, too.
I didn't get a chance to test this on XM Cloud, but given SPE's flexibility, it is likely compatible.
How about a quick demo?
Say you need to audit template usage across the content tree.
When activating SPExAI from the ribbon, a dialog
appears where you set a title, select the root context for the report, and provide a description.
"Report of all templates (ID, Name, Path) and their usage count."
SPExAI generates this clean, complete, and reusable script, which is stored in a dedicated part of the
content tree:
Running the generated script without any modifications
(which, on its own, included an option to select a root context, making it easily reusable against different parts
of
the tree) provides an accurate result set!
Another demo!
"Report of all renderings (ID, Name, Path) and their usage count under a selected content
root."
SPExAI again generates a clean, complete, and
reusable
script, stored again using the name provided:
Running the generated script confirms that the
script has been correctly generated and provides expected results.
What's truly amazing is that we can generate 75-100 lines of working PowerShell code in seconds.
The code is appropriately structured, cohesive, error-free, and ready to be run immediately—no developer
needed!
How SPExAI Works (Under the Hood)
API Settings
Before anything runs, the module looks for a specific Sitecore item:
Model – the ID of the OpenAI model to use (e.g. o3-mini-2025-01-31)
Knowledgebase – a markdown-formatted reference block full of Sitecore PowerShell examples, documentation, best practices, etc.
System Prompt – the instruction template that tells the model exactly how to behave, respond, etc.
The module will abort early if any of these are missing.
Model Selection
During development, I tried a few different OpenAI models. The one that gave me the most consistent, one-shot
responses
was o3-mini-2025-01-31.
If you want to try a different OpenAI model later, simply update the Model field
with
the name; no code changes
are
required. (Expanding beyond OpenAI to Anthropic Claude or Google Gemini is also possible as part of a potential future v2.)
The Knowledgebase
This field contains raw reference material to guide the AI's responses. Think of it as an internal code
cookbook,
mostly pulled from the official SPE documentation and a compiled generic collection of snippets from my private repository of PowerShell scripts.
It
includes sample report formats, SPE-specific syntax, and usage patterns that the model should stick to when replicating and generating new reports.
Looks like this:
The System Prompt
This is the master instruction set. Essentially, "You are a Sitecore PowerShell assistant...you do
this,
this, and
that..." with additional
specific constraints and formatting rules.
It includes a {0} token that the
Knowledgebase content replaces.
Check it out:
A good chunk of the hackathon effort was spent refining the directives that the model should
abide
by. With every
test run, I found myself adding to the list of rules.
Getting the model to stick to the directives was...challenging to say the least (one-shot prompting
definitely has its limitations
depending on the model).
Finding the right combination of rules for the model to consider was tricky, and I'm sure both the base
system prompt and the knowledge base content could use
even further refinement beyond what I could get done before the deadline. Either way, I feel like I
struck a solid balance for v1.
The good news is that the
module was built to easily modify the system prompt in the configuration item without touching the
underlying
code, hypothetically allowing you to continuously improve the final output.
UX Flow
SPExAI provides a new button in the Sitecore Ribbon. When clicked, this buttonsurfaces a
dialog window for the user's input.
Users fill out the Report Name, set the Report Scope (tree selector), and the Describe your Report fields.
It takes only a few seconds for the script to be generated.
Users are then presented with
the
following options:
SPExAI Code Breakdown
Here's how the pieces come together behind the scenes:
1. Load the API Settings
The script set the four field values into variables.
2. Present a dialog for user input
The user's inputs from the dialog (report name, scope, description) are stored
as global variables.
3. Variable validation
Validate that variables, like the script name, are valid and don't already exist
in the saved script
location.
4. Invoke the custom `Invoke-OpenAIChat` function
Invoke-OpenAIChat sends a custom one-shot prompt (including merging
system
instructions, knowledgebase, and user input) to OpenAI’s Chat Completion API and returns the generated
response.
5. Save the script to the tree
Upon successful script generation, the module saves all
generated scripts under a dedicated folder: /sitecore/system/Modules/PowerShell/Script
Library/SPExAI Report Generator/Content Reports/Reports/SPExAI Generated
6. Open, Run, or Close Dialog
After saving the script item, the module presents a modal dialog with its
three
choices:
1. Open Script Item – jumps to the new item in the Content Editor
2. Run Report – immediately executes the report using Invoke-Script
The quality of entries this year made it hard to predict how
things
would
shake out. Winning was unexpected, but also an absolute honor.
Bummed I couldn't be at SUGCON EU to accept the award in person, but luckily the announcement was recorded. 😀 I will cherish this screenshot for all time:
Each year I've participated (whether on a team or solo), I've come away with valuable hackathon experience
and
a
solid module, or at least the beginnings of one, that I could share and expand on further. I've always
enjoyed
the
satisfaction of shipping something interesting and useful to others under competitive pressure.
If you’re considering participating next year, I highly encourage it. About 20% of the teams are solo, but it's not for everyone. I recommend grouping up with others, especially if it's your first Hackathon.
It’s a great way to push yourself, learn something new, make connections, and contribute to the spirit of the Sitecore community.
Another year, another exciting Sitecore Hackathon! This round, I flew solo under the moniker "Sitecorepunk
2077" (a play on the critically acclaimed 2020 action role-playing video game "Cyberpunk 2077").
If you're curious how the event unfolded, I documented my progress on X (formerly Twitter) every couple of hours:
⌚ 4 hours deep into #SCHackathon 💡
I've got an idea that I think I'm rolling with. ☑ Proof-of-concept was successful.
🔍Exploring how I want to proceed with a proper implementation.
⌚ 20 hours into #SCHackathon
<4 hours remain ✅ Video production ✅ Video uploaded + ReadMe link updated ⏳ Documentation
finalizations ⏳ Commit to Git 🏁 I can see the finish line!
⌚ 21 hours into #SCHackathon
< ~2.5 hours remain ✅ Video production ✅ Video uploaded + ReadMe link updated ✅
Documentation finalizations ✅ Commit to Git 🚀 DONE!
Needless to say, I was utterly exhausted and slept for 12 hours straight, following the 32 hours I had been
awake. While I didn't snag a win (congrats, team Cloud Surfers and team 451 Unavailable For Legal Reasons ), I enjoyed the experience, am proud of what I was able to output, and look forward to the next one.
Module Concept and Inspiration
The 2024 Sitecore Hackathon category I chose to work against was "Best Module for XM/XP or XM Cloud" - although the result could also fit the bill for "Best use of AI". Inspired by the ever-increasing need for accessible content, I decided to develop a module that converts text content into spoken audio files, which are then stored remotely and saved as an MP3 links within the item's context - all from within Sitecore. Ultimately, once I landed on the idea, the goal was to provide an easy-to-use tool for generating audio
versions of Sitecore content, thereby enhancing accessibility and improving user engagement for individuals with visual impairments or
preferences for audio content.
Features
Here’s a breakdown of what makes the SPE Text-to-Speech Audio Synthesis Module stand out:
Lifelike Speech Synthesis from Microsoft Azure Cognitive AI Speech Services
One of the core features of this module is its ability to convert text content into lifelike speech. By transforming text
into life-like speech, the module makes content more accessible to a broader audience, including those with visual impairments
and individuals who prefer consuming content through audio.
The module utilizes Microsoft Azure Cognitive Services Speech Service to generate audio from
selected text fields dynamically. This integration ensures high-quality, natural-sounding speech output. Whether
it's a blog post, news
article, or product description, every piece of content can be converted into audio, broadening its reach and
enhancing user engagement.
Storage via Azure Blob Storage
To store the generated audio files, the module leverages Azure Blob
Storage APIs. Once an audio file is
generated and store locally in a temporary directory, it is then uploaded to a dedicated Azure Storage container. The API returns a URL to the audio file, which is then
populated in the context page item’s Audio URL field.
Interface and Custom Ribbon Button
A custom Ribbon Button on the Home tab streamlines the audio-generating process. This button triggers
an interactive Sitecore PowerShell Extensions dialog where authors can configure various options, such as voice selection, field selection, and speech rate adjustment, and kick off the speech synthesis generation.
The customizable options ensure the audio output matches the intended tone and speech rate, providing a tailored
listening experience.
Multi-Language Support
Recognizing the diverse needs of global users, the module supports multiple languages. For demonstration purposes and
within the natural time constraints of the Hackathon, the following languages are supported in the initial implementation:
English (en)
Japanese (ja-JP)
German (de-DE)
Danish (da)
Each supported language selection has a series of Neural
(lifelike, natural-sounding) voice options from Microsoft Azure Cognitive Services Speech Service (~449 neural voices to choose from). These
hand-selected voices are configured to provide the best audio experience for each language. Of course, support can be expanded to include additional languages (there are 136 languages supported by Azure AI Speech Services).
High-level Technical Breakdown
Initialization and Setup
The script sets up the necessary Azure services and local environment configurations.
User Interaction and Dialog Configuration
The script provides a dynamic interface through a custom Ribbon Button in the Sitecore Content Editor. This button, titled 'Generate Audio' or 'Regenerate Audio' based on the context item’s state, opens a dialog for configuring the audio output. The fields and options available in the dialog are as follows:
- Field to Convert to Speech
Lists all Rich Text Editor (RTE) and multi-line text fields available on the item.
Special Case: If the 'Speech Content Override' field is populated, it appears as an additional option.
- Include Title?
A standalone radio button to include the item's title in the audio file.
- Voice
Dynamic option based on the item's language, the dialog offers preselected AI Neural voices.
- Speech Rate
Control the how fast the speech is spoken.
Optional double value, defaulting to 1.0 if left empty.
Range: Between 0.5 (slow) and 2.0 (fast).
The dialog properties and user input handling are defined as follows:
Fetching and Sanitizing Text Content
The Invoke-AudioStreamFetch function handles the core functionality of fetching the text content from
Sitecore, sanitizing it, and preparing it for conversion into speech.
The function checks if the title should be included and concatenates it with the main text content. It then sanitizes
the text by removing HTML tags and special characters, ensuring clean input for the TTS service.
Sending Text to Azure AI for Speech Synthesis
As seen above, the sanitized text is then sent to the speech service endpoint for conversion into an audio file. The response, which
contains the audio stream, is saved locally.
Uploading the Audio File to Azure Blob Storage
Once the audio file is generated, it is uploaded to Azure Blob Storage by calling the Upload-FileToAzureStorage
function. This function handles the Azure Storage REST API authentication and the file upload process.
Updating Sitecore Item with Audio URL
After uploading the audio file to Azure, the script updates the Sitecore item with the URL of the audio file,
ensuring that the content authors can easily access and manage the generated audio files.
Utilizing the Audio File on the Front-end
Once an item's Audio URL field has been populated, it can be used on the front-end within an HTML audio tag:
This is the simplest approach for playing the audio file, but further styling customizations are doable.
Video Demo
Part of the Hackathon Entry includes a video demo. You can check it out below:
Final Thoughts
Participating in the Sitecore Hackathon has always been an exhilarating experience for me, given the time crunch and competitiveness of the community. That night, the development of the SPE Text-to-Speech Audio Synthesis Module pushed my organizational and technical boundaries, and I'm proud of what I could accomplish in such a short timeframe. More importantly, I hope the resulting module helps highlight the importance of accessibility in content management and end-user experiences.
If you're interested in or inspired to build your own Text-to-Speech synthesis module, the full PowerShell script and documentation are available on Github.
On January 5, 2021, OpenAI revealed DALL-E,
an artificial intelligence program that creates images from textual descriptions, on January 5, 2021. It uses a
12-billion parameter training version of the GPT-3 transformer model to interpret the natural language inputs and
generate corresponding images.
Since the initial private beta release, access to DALL-E was limited to those on a waitlist. However, about a month
back, on September 28, 2022, DALL-E 2 opened to the public, and the waitlist requirement was lifted. Over the past
month, millions of users have explored DALL-E's capabilities using https://labs.openai.com/.
DALL·E joins GPT-3, Embeddings, and Codex in our API platform, adding a new building block that developers
can use to create novel experiences and applications. All API customers can use the DALL·E API today.
As soon as I heard the news, I couldn't help but immediately explore the API myself. I was already
familiar with OpenAI's API playground for text-based AI prompts and had an existing API key ready.
My first instinct to consume the DALL-E API was to use plain old Windows PowerShell 🤓
"A photorealistic close-up of a variety of river
rocks"
"A super cute puppy"
So dope 😎 - and wildly simple!
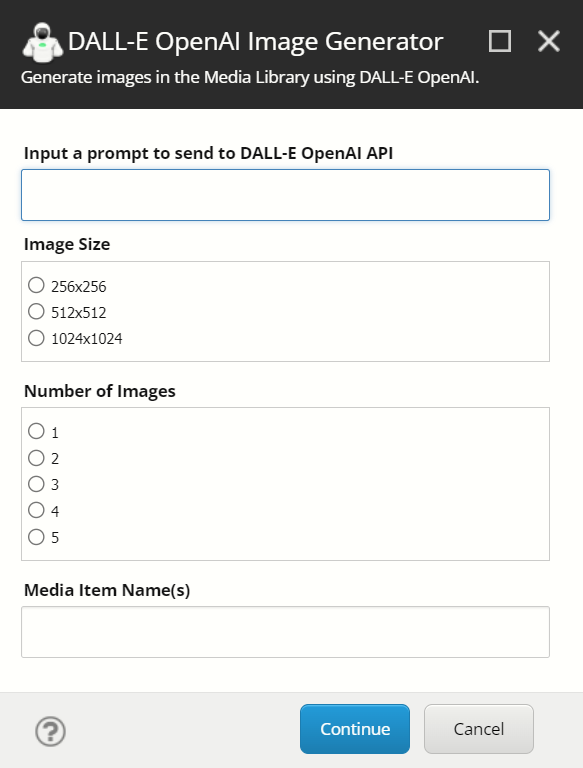
DALL-E OpenAI Image Generator for Sitecore
AI-generated images were featured prominently in
Paige O'Neill's keynote at the 2022 Sitecore Symposium in Chicago.
There's real value in this technology. A reality where designers, marketers, and developers who need a
patterned backdrop can unleash their creativity to quickly and easily generate an image without needing to
license stock images is nearly here. Even in its current state, the ease and simplicity of the DALL-E API
make this the perfect candidate for consuming in a CMS.
With the fresh release of the DALL-E API, I couldn't think of a better time to give it a whirl and
integrate it into Sitecore.
Naturally, Sitecore PowerShell Extensions was the way to go. The 'Context Menu' and 'Insert Item'
integration points allow users to open the prompt while targetting any 'Media Folder' - either by
right-clicking, expanding Insert, and selecting 'DALL-E OpenAI Image Generator' or selecting
'DALL-E OpenAI Image Generator' from the Folder tab of the active Media Folder.
Both integration points are configured out-of-the-box to only show on items where the Template is a 'Media
Folder.'
Once the prompt is toggled, the user can configure their call to the DALL-E API using the following inputs:
The number of images to generate (DALL-E API allows an
integer from 0 to 10. The module limits generation to up to 5)
The base name for new Media Items created in the Media
Library after images are generated from DALL-E.
The module also comes bundled with a Settings item located in the following location:
/sitecore/system/Modules/PowerShell/Script Library/DALL-E OpenAI Image Generator/OpenAI API Settings
{F102AE0D-6A5B-499B-9500-505D0E6F686F}
This item allows users to change or override some default settings - the most important being the 'OpenAI API
Key' field, where users must populate their unique API key. after installing the module, You can
generate an OpenAI API Key by logging in and navigating to the API Keys settings for your account: https://beta.openai.com/account/api-keys
The Setting item's Template is located in the following location:
The module is totally open to any community contributions or general suggestions. Beyond that, feel
free to fork a version of your own a build on top of it.
Final Thoughts
I'm really excited about this space and where I believe it's headed. As this technology continues to grow,
we should expect an expansion of the DALL-E API (and others) that will almost certainly redefine how we work
with digital visual assets.
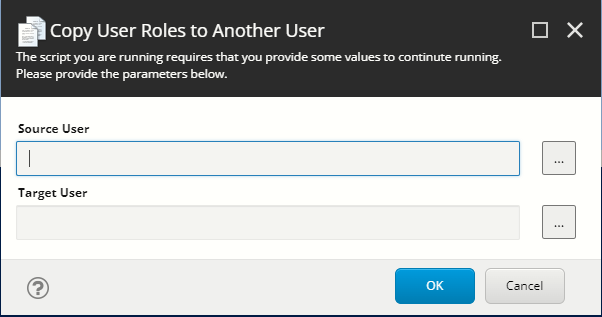
I recently had received a request to add several new Content Author accounts to the CMS and apply the exact user roles from a specific user to the new users. I ended up scripting this with Sitecore PowerShell Extensions using hardcoded variables (usernames and roles), but because I expect similar requests in the future, I wanted a quick way to copy roles from one user account to another to use in the future. Since I couldn't find a script readily available to do this, I developed my own.
The script utilizes the 'user' editor type (which doesn't happen to be listed on https://doc.sitecorepowershell.com/interfaces/interactive-dialogs - yet still works) within an interactive 'Show-ModalDialog.' It allows you to select a "source user" and a "target user" from the list of all available user accounts. After choosing both, the script iterates through each source user's roles and applies the target user to each user role.
The script loads the modal and requires the user to select a Source User and Target User.
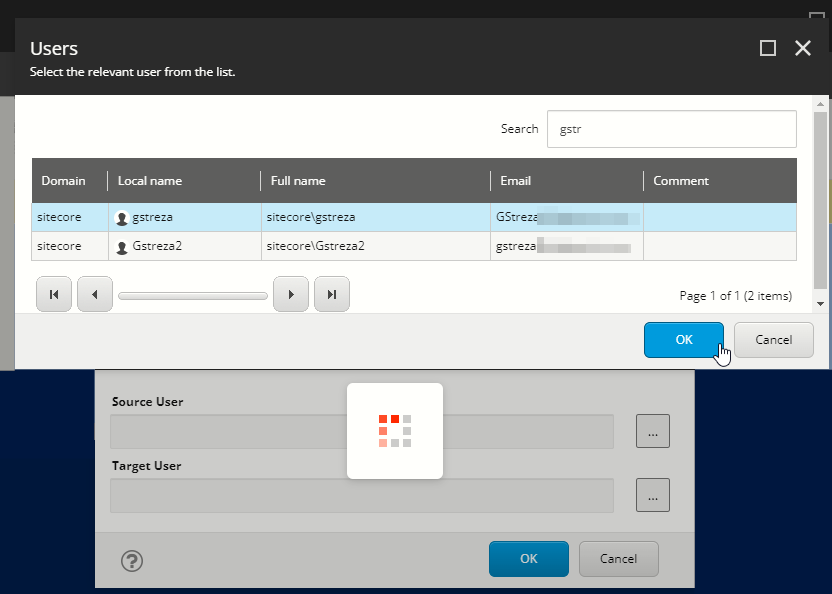
Clicking the ellipses button opens a separate dialog that lists all users.
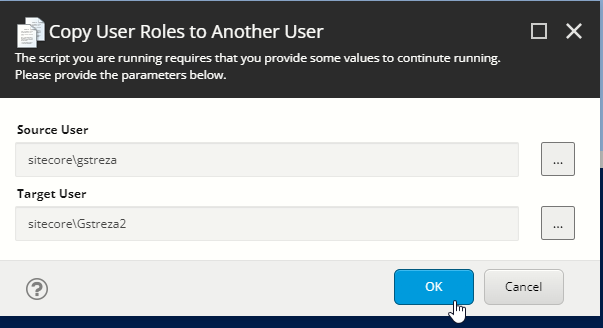
After selections are made, click OK to initiate the copying of roles.
The script can be run in Sitecore PowerShell ISE or configured as a module that can be run from the Start Menu.
If you’re anything like me, you probably don’t have a passion for manually digging through the series of hundreds of randomly dated folders that look like this in search of the latest Sitecore logs:
Hello darkness, my old friend
Although several tools and approaches are available (including this nifty tool credited to fellow Sitecore MVP Kiran Patil - as well as some of my own previous posts from 2018 and 2019 covering this topic), I've recently adopted a different strategy that's proved to be successful across several Sitecore PaaS clients for quickly obtaining the latest physical Sitecore log for a given server.
The post-worthy kicker? It's one line of PowerShell:
We can pipe in a Where-Object cmdlet to filter only file names that match 'azure.*.txt' (or if you want all log types - Publishing, Crawling, Dianoga, SPE, etc. - *.txt) and provide a 12-hour threshold against the `LastWriteTime` property:
Notice that in the ForEach-Object cmdlet, we create a variable called `$path` and set it to a string that takes the file's FullName and replaces the 'system path' portion, and replace it with our `$kuduHost` variable concatenated to `/api/vfs/site/wwwroot/App_Data/logs/`.
Without this string replacement, we'd only get the system path for the files in the dataset, which would still require navigating to the file manually:
Also, within the ForEach-Object cmdlet, a formatted string containing the LastWriteTime and the `$path` variable is added to the `$array` variable:
$array += "[$($_.LastWriteTime)]`n$path`n"
The `n used above allows for line breaks.
After the files have been processed, the `$array` variable is called and sorted by LastWriteTime.
A Select-Object cmdlet is piped in to limit the number of results to 3:
You can generate variations of this one-liner by changing the various variables, which can be shared with the rest of your development/troubleshooting team and readily ready to copy from an internal Wiki:
Feel free to use and modify the script as you see fit. 🚀
I managed to snag a category win for the 2021 Sitecore Hackathon! 😅
This year, I unexpectedly flew solo as my team members could not attend (both
due to completely understandable reasons). Luckily for me, one of this
year's categories, in particular, made me feel like I stood a chance: "Best use of Sitecore PowerShell Extensions
to help Content Authors and
Marketers."
YES. YES YES 1000x YES.
Knowing that I needed to
land on something fairly quickly to complete all submission requirements (a
completed module with clean code, reliable installation instructions, a
well-documented README.md, and a video) my evening began with a brainstorming session listing all possible routes I could take for the next 24 hours.
I actually landed on a similar concept I posted about a couple of years back;
interacting with
Microsoft's
Cognitive Services
using PowerShell,
then focusing
on content translation. I knew Microsoft had continued to update their API offerings since that
post, so I started digging into what was new. I stumbled upon
the Sentiment Analytics API, which seemed like an excellent use case that
could satisfy the 'help
Content Authors and marketers' category requirement.
By providing the right combination of SPE user interactivity (modal dialogs,
accessibility of the utility in the Ribbon, etc.), I could build a utility
that analyzes content from a given field and provide a sentence-by-sentence
breakdown of the content's sentiment score using AI.
After playing
around with the example APIs in the browser, I decided to create my
Text Analytics Cognitive Service in Azure, grab my API keys, and fiddle around with the API
further in PostMan. At that point,
I felt pretty confident that I could integrate this with SPE. 🤞
The Sentiment Analyzer would
Analyze the sentiment of field content directly in Sitecore.
Give Content Authors the ability to run an analysis of a given field's
content, which returns an overall sentiment score and a sentence-by-sentence
breakdown of each sentence's sentiment score and corresponding confidence
scores.
The results are displayed using a Show-Result modal and rendered in an
easy-to-digest format.
I built the user dialog, wrote code that generated the appropriate POST data to be passed to the sentiment API endpoint, built the functions to render the data (using emojis, of course 👩🚀), configured a new Sitecore template and the corresponding item for API key storage then tied it all together into an SPE module that exposed the tool from the right-clicked Context Menu,
and from the Ribbon.
As midnight approached, I felt that I was in decent enough shape
with the Sentiment Analysis script, I could begin exploring using another API in the same Text Analytics product group. I moved forward with a second tool
utilizing the API's keyphrase extraction feature
without a tremendous amount of overhead; mostly endpoint changes, JSON
parsing, and data rendering differences.
The Keyword Analyzer would:
Analyze a field's content to extract critical keywords/phrases.
Give Content Authors the ability to analyze a given field's content which returns a list of extracted keywords that can then be used to manually populate a meta keywords field.
The results are displayed using a Show-Result modal and rendered in an
easy-to-copy format.
I got started, but a couple hours later...
Okay, it's ~2:30 AM. I'm going to sleep.
#SCHackathon
I'm awake after a few hours of sleep and briefly back to review the ~300
lines of PowerShell I wrote yesterday for
#SCHackathon. Both my
kids seem to have woken up with colds so my priorities may need
to shift today. 🤧
I spent most of the day (alongside juggling sick-kids priorities) polishing
the scripts I had so far; resolving logic issues, error prevention, adding
code comments, and overall meticulous code clean-up.
Eventually, I
had a functional set of utilities.
Buttons in the Ribbon configured in the SPE module.
Dialog when clicking either utility against an item with a
Single-Line, Multi-Line, or Rich Text field.
Sample output of sentiment analysis
Sample output of keyword analysis
I made sure to stop by for a late morning Coffee Break. ☕
Shout out to the #SCHackathon warriors who joined us for Coffee Break. Special big up @GabeStreza who stepped up to fly solo!
I built the final structure of the SPE module using the Module Wizard 🧙♂️ to configure my integration points. The module also stores the API Settings item, so swapping in an API key would be seamless for anyone who installs the module.
⚡ The module looked like this in the tree:
I spent the final hours of the event packaging the module/testing the installation steps before working on multiple documentation phases (using Markdown for absolutely everything in 2020 was really coming in handy).
It wasn't long before a mid-afternoon Twitter update:
The video production was probably one of the most challenging parts of this experience. After writing a short-handed verbal script, I tried to record the entire demo in a single recording. I used OBS Studio to record and the built-in Video Editor in Windows for post-production. I even squeezed some personal music snippets I composed some time ago without risking Copywrite strikes on YouTube. 😂
The video submission can be viewed here:
By around 5 PM, I was done and had submitted my entry 🚀
The full Github submission can be found here, including the full source code for both scripts, the module ZIP for installation, and installation steps.
Take it for a spin if you care to! 🤹♂️
I'm really humbled and proud to have been a part of the winner's circle this year. Another big shout-out to the folks who run and judge the event, as well as a big congratulations to the other category winners!
9x Sitecore Technology MVP 🏆 National Practice Lead + Sr Solutions Architect @ Genpact Experience 💻, Dad x3👨👩👧👦, Drummer 🥁, Tech junky 👨🏻💻 All views posted here are my own.

 Earlier this year, I built