
Monday, October 19, 2020

Monday, August 31, 2020
🆕 Sitecore Icon Search Update: JSS Icons
Sitecore Icon Search has been around since 2018 and is still used widely across the Sitecore development community (9,000+ visits in 2020 so far). Generally, the app has been self-sustainable as the approach hasn't changed from version to version.
Last week, a couple of my colleagues sent me a request:
Gabe – do you think you can add the JSS enum as a column on Sitecore Icon Search?
Tuesday, August 4, 2020
Sitecore 10 Docker Containers: Cannot start service solr
It's here! Sitecore 10 has been released into the wild today and it comes with a refined developer experience that includes official container support. This is super exciting and really helps solidify my thoughts around Docker and its role in the Sitecore developer ecosystem.

At first glance, this looked like a collision issue with some existing Docker NAT network residual from my other Docker containers.
Check out this great documentation site also released today: https://containers.doc.sitecore.com/docs/intro
Well, I jumped right in and, while things appeared to be going smoothly (all images downloaded successfully), I stumbled on this error when composing the container up:

At first glance, this looked like a collision issue with some existing Docker NAT network residual from my other Docker containers.
I tried:
None of these attempts helped, unfortunately.
If we look at how Solr is defined in the docker-compose.yml file, we'll see that the port is set to map to :8984 on your local machine to :8983 on the running Solr container.


Whenever I installed new Solr instances, avoiding using ports that were already being used for existing Solr instances was a prerequisite (eg. if I have one version of Solr running on 8983, for the new version of Solr I'd use 8984. If I needed another version of Solr, that one would use 8985, etc). The same applies in this case.

By stopping the running 5.1.4 Solr service on my local machine, I was able to free up the port 8984, allowing the Solr instance in the Docker container to occupy it:

- Pruning the Networks using the VS Code Docker Extension:

- Stopping all Docker processes and its relevant services, and restarting:
- Restarting my machine
None of these attempts helped, unfortunately.
If we look at how Solr is defined in the docker-compose.yml file, we'll see that the port is set to map to :8984 on your local machine to :8983 on the running Solr container.

In my case, I have multiple Solr instances running on my machine from previously installed Sitecore instances:
Whenever I installed new Solr instances, avoiding using ports that were already being used for existing Solr instances was a prerequisite (eg. if I have one version of Solr running on 8983, for the new version of Solr I'd use 8984. If I needed another version of Solr, that one would use 8985, etc). The same applies in this case.
Because the default Sitecore 10 Docker Compose is trying to use port 8984, it must be available.
I navigated to each Solr installation on the filesystem and confirmed that port 8984 was in fact mapped to my local 5.4.1 Solr instance.

By stopping the running 5.1.4 Solr service on my local machine, I was able to free up the port 8984, allowing the Solr instance in the Docker container to occupy it:

Happy Sitecore Release Day! 👍
Friday, July 31, 2020
Generate Google Lighthouse Reports with Docker using PowerShell

While browsing Docker Hub, I came across this
nifty Google Lighthouse Docker image (by Jay Moulin) which allows you to execute a Lighthouse audit against a given URL
in a containerized application -
made possible by the Google Chrome Headless Docker base
image. From a practical standpoint, this feels more reliable than running Lighthouse in the Chrome browser where extensions and other variables can easily interfere with the results of the audit.
You can check out the Dockerfile for this image here:
Consuming it is pretty straightforward. With
Docker installed and running while switched to Linux containers, two
commands are all you need:
Additional options for the Lighthouse audit, like controlling the emulated device form factor (mobile vs. desktop), controlling the throttling method (devtools, provided, simulate), or defining specific categories (Accessibility, Best Practices, Performance, PWA, or SEO) can be included after the URL.
However,
that's quite a bit of text to remember, and memorizing a bunch of Lighthouse CLI
options are not something I
see myself doing. 😋
BUT - we can make this tool more approachable by wrapping it in a PowerShell script. 😍
The name of the game is simplicity: execute .\LighthouseReport.ps1
from a PowerShell terminal, pass in a URL/standard Lighthouse options,
and let it run.
To take it a step further, we can open the $DestinationPath in Windows Explorer by using an Invoke-Item command:
Simple - yet effective!


👨💻 A Little PowerShell
In a new PowerShell file, we'll add a mandatory string parameter called $Url.
We'll also include non-mandatory string parameters:
- $FormFactor
- Valid
options for the '--emulated-form-factor='
flag are 'none', 'desktop', or 'mobile'.
- Default value when no parameter
is provided will be 'desktop'
- $Throttling
- Valid
options for the '--throttling-method=' flag
are 'devtools', 'provided', or 'simulate'.
- Default value when no parameter
is provided will be 'provided.'
- $Categories (array of strings)
- Valid options for the '--only-categories='
flag are 'accessibility', 'best-practices',
'performance', 'pwa', 'seo'.
- Default value when no parameter
is provided will a comma-delimited string of all
applicable categories 'accessibility,best-practices,performance,pwa,seo'
- $DestinationPath
- The
local path to where the report will be 'dropped.'
(used as a volume mapping to the container's '/home/chrome/reports'
directory)
- Default value when no parameter is provided will be "C:/lighthouse"
We'll add the docker pull command for femtopixel/google-lighthouse first. During the initial execution of the script, all required images will be downloaded from Docker Hub.
If your image becomes stale or a newer version is available, this will automatically update the image.
Then add the docker run command with the -v flag to mount a
volume to map the local $DestinationPath to the /home/chrome/reports directory on the container. Include the $URL parameter at the end, and all options following:
When the docker run command is executed, Docker will take over, and Lighthouse will begin to
execute on
the
container. Once completed, a .html file will be
available in
the $DestinationPath.
To take it a step further, we can open the $DestinationPath in Windows Explorer by using an Invoke-Item command:
If we want to open the .html report, we can set the
PowerShell
location to the $DestinationPath, followed by an Invoke-Item
where we pass in Get-ChildItem latest .html file.
Simple - yet effective!
🏁 Final Script
⌨ Example Usage
Desktop form factor auditing all categories:
Desktop form factor auditing Best Practices, Performance and SEO only:

Mobile form factor auditing Performance only:

💡 TIP: When setting a parameter (-FormFactor, -Throttling, -Categories), you can use
Ctrl+Space to display valid options and hit enter to select it.

🙌 Feel free to grab a copy and modify it to your liking.

👍 Result
🙌 Feel free to grab a copy and modify it to your liking.
Wednesday, July 22, 2020
Approaches to Dockerizing Existing Sitecore Solutions for Local Development

As a developer at a digital agency working in Managed Services, I work with multiple customers spanning multiple versions of Sitecore. The client sites, more often than not, are inherited from vendors outside of reach - each with a unique set of onboarding steps and requirements.
Thursday, May 21, 2020
Part II - Integrating Automated Reverse Azure Database Migration PowerShell Script into Azure DevOps

In my last post, we wrote a handy PowerShell script that takes the latest Master and Web SQL Databases from a Production-level Azure Resource Group and imports them into a Staging/UAT/Dev Azure Resource Group for a seamless reverse database promotion process.
The original script, however, relies on a developer to run the script manually on a local machine and authenticate their credentials in order to utilize the AzureRm commands:
We can take this script a step further and integrate it as a new stage in the existing Azure DevOps Release Pipeline, or as a new dedicated Release Pipeline that can be executed independently.
In this example, we will create a new Azure DevOps Release Pipeline. We'll assume a Service Principle connection already exists (which is likely if you're deploying to your App Services using Azure DevOps already) and you have the proper administrator permissions to create pipelines in Azure DevOps. We'll also be working with an Inline Azure PowerShell script job instead of including a script file from an artifact. Steps will slightly differ if you want to go that route, but the concept would remain the same.
Release Pipeline Setup
Head over to the Pipelines > Release dashboard, click the New dropdown and select New release pipeline.

In the 'Select a template' menu, click 'Empty job'.
Modify the Pipeline name, then click on Stage 1 and click the plus sign on Agent job to add a new agent. Search for 'powershell', find Azure PowerShell task and click the Add button

Set the Azure Subscription to the appropriate service principle, set the Script Type to Inline Script, and set the Azure PowerShell Version to Latest installed version

Save the pipeline and navigate to the Variables section
Variable Setup
Here, we'll add all the variables that we'll consume in the script - allowing for future modification without touching the script code itself.
In our case, our script calls for the following variables:
- - sourceResourceGroupName
- - sourceSqlServerName
- - sourceMasterDbName
- - sourceWebDbName
- - targetResourceGroupName
- - targetSqlServerName
- - targetSqlServerAdminUserName
- - targetSqlServerAdminUserPassword
- - targetMasterDbName
- - targetMasterSqlUserPassword
- - targetWebDbName
- - targetWebSqlUserPassword
- - targetCdServerName
- - targetCmServerName

Script Modifications
Luckily, our original script doesn't need too much tinkering! Just a bit 😉
First, we'll want to remove the Login-AzureRmAccount command altogether since the Azure PowerShell task in the pipeline will authenticate off of the service principle.
We'll then replace any hardcoded variables with their new corresponding variables we previously configured throughout the script using the $env:someVariableName format:

Tuesday, April 21, 2020
Automate Reverse Azure Database Migrations using PowerShell
Working with Production-level content in lower environments (eg. DEV or UAT) is important for ongoing development and testing. Depending on your item serialization/source control approach, keeping content in sync can be a challenge.
Using Unicorn or TDS for templates and layouts is common, but source-controlling all content (specifically media items) can bring a lot of weight to the project. In lieu of utilizing serialization technologies or a synchronization tool such as Razl to synchronize content (which I've seen take hours to complete depending on the content load), a common approach is to periodically restore the Master/Web Databases from a Production environment down to lower environments.
In an Azure PaaS setup, without any automation or scripting, this manual process may look like this:
1) Log in to Azure Portal
2) Navigate to the source (production) SQL server instance's Master/Web database
3) Click the copy button and set up the database copy operation configuration (target database name, target server, and pricing tier)
5) Execute the copy operation and wait for the copied database to become available.
6) Log into the target SQL Server instance using SQL Server Management Studio or use the SQL Database Query Editor built into Azure Portal, and execute an ALTER USER query to reset the login password to match the original database passwords
7) Rename the currently connected Master/Web database to include a suffix in the name (eg. _OLD)
8) Rename the copied Master/Web database to use the original Master/Web database name
9) Restart the server
Obviously, this process can vary and is generally a tedious and time-consuming process.
Luckily, Azure resources can be managed using the suite of PowerShell commands without ever needing to access the UI. With the right script, the strain of manually executing these steps can be alleviated.
To use these commands, the Azure PowerShell Module must be installed.
For our scenario, let's assume the following:
1) PROD environment is in a separate Resource Group than the NON-PROD environment
2) While the Master database should suffice, we'll also copy down the Web database to avoid requiring a publishing operation after the script has completed.
3) ConnectionString.config value should not require modification.
4) A short "outage" of the NON-PROD environment will occur during the process since the connected database will be renamed to make room for the copy.
Let's Script It
Step 1 - Define Target and Source Variables
We need to define our target and source variables including source/target Resource Group Names, SQL server names, database names, and NON-PROD environment SQL Admin Credentials.
Step 2 - Invoke Azure Login Process
Step 3 - Rename the currently connected database to make room for the copied database
Since the name of the database on the NON-PROD environment should remain constant, this command will rename the existing NON-PROD database to include a unique dated suffix. Note that this database will not be removed automatically and can be used as a backup in the case that the NON-PROD environment contained content that was not accounted for or backed-up prior to the migration. Removing it will be up to you.
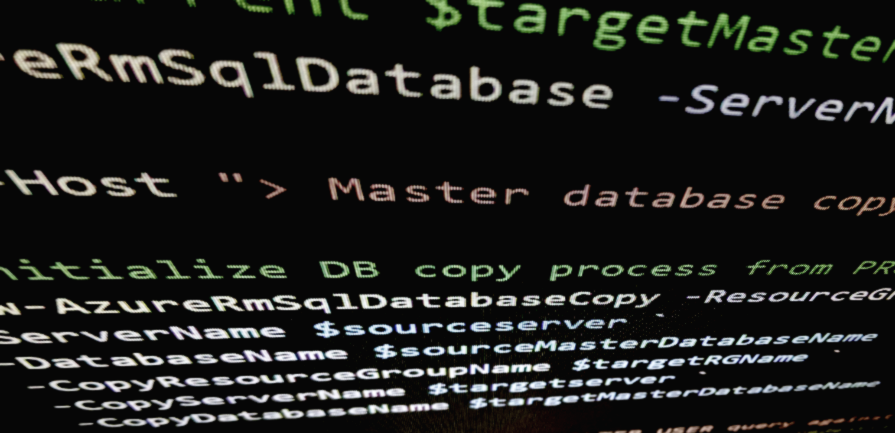
Step 4 - Initialize the database copy operation
Once the name of the database is available on the target SQL server, the following command will execute the database copy process.
Step 5 - Execute the ALTER USER query
Since the database login from the source database comes with the process of a direct copy, an ALTER LOGIN query must be executed against the database to reset the [masteruser] or [webuser] passwords to match what's in the NON-PROD ConnectionStrings.config.
Step 6 - Restart the App Service
When the copy operation is completed, restarting both App Services will ensure a fresh connection to the databases is established.
Final Script
Thursday, April 9, 2020
RIP Sitecore App Center: Remove and Re-purpose Sitecore App Center Shortcuts with PowerShell
Last week, while we were all preoccupied with COVID-19, Sitecore did something nobody could have predicted.
Between the chaos, our beloved Sitecore App Center was discontinued.
Not many people seemed to care about my PSA, though:
This probably would have generally slipped past me until months after the update, but this happens to come to my attention because a client wanted to start using GeoIP functionality in Sitecore in the middle of their transition to retiring the aged feature. The stars aligned, and I was fortunate enough to watch it all unfold before my very eyes.
Until now, Geo IP Service activation had always been a two-part process:
1) Guide the client to sign up for the Geo IP Service in the Sitecore App Center - which happened to be baked into the CMS, sourced out to an external endpoint, and required customer login (partners typically didn't have access to log in and activate anything).
2) Make the necessary configuration and firewall updates.
The client immediately reported an issue loading the Sitecore App Center.

Lo and behold; a broken App Center (all environments, including local):

Sitecore's Cloud Status page happened to indicate that the App Center UI was "under maintenance" at the time.

This was on March 30th, a couple days after their maintenance window had closed.
Two days later - after much anticipation - an update was posted:

In addition to this status page update, the Sitecore documentation was updated to reflect the updated Sitecore Support Portal approach for activating the Geo IP Service:
Okay, cool. I think that makes things a bit easier going forward.


A quick search targeting the Core DB revealed those item definitions.

The specific items that control the shortcuts are:
LaunchPad
For this shortcut, you have a few options:
1) Delete it
2) Move it outside of the Tools folder and into the PageSettings folder
3) Edit the Link field to point to the permanent Sitecore Cloud Status Page related to this event
I prefer option 3 because it could at least potentially help guide future devs or marketers in the right direction when activating the GeoIP service - specifically if it had always remained off.

Start Menu
To disable the shortcut, clear out the Application field.

👍
The script disables the Start Menu shortcut, then gives the option to repurpose or disable the Launchpad shortcut:

⚰ RIP Sitecore App Center
 Last week, while we were all preoccupied with COVID-19, Sitecore did something nobody could have predicted.
Between the chaos, our beloved
Last week, while we were all preoccupied with COVID-19, Sitecore did something nobody could have predicted.
Between the chaos, our beloved Not many people seemed to care about my PSA, though:
PSA: #Sitecore App Center embedded application and UI have been discontinued. GeoIP activation and Managed Cloud consumption reviewing capabilities have moved to the Sitecore Support & Self-Service Portal. https://t.co/9X0kgoxxtM— Gabriel Streza (@GabeStreza) April 1, 2020
This probably would have generally slipped past me until months after the update, but this happens to come to my attention because a client wanted to start using GeoIP functionality in Sitecore in the middle of their transition to retiring the aged feature. The stars aligned, and I was fortunate enough to watch it all unfold before my very eyes.
Until now, Geo IP Service activation had always been a two-part process:
1) Guide the client to sign up for the Geo IP Service in the Sitecore App Center - which happened to be baked into the CMS, sourced out to an external endpoint, and required customer login (partners typically didn't have access to log in and activate anything).
2) Make the necessary configuration and firewall updates.
 |
| The options were endless. |
The client immediately reported an issue loading the Sitecore App Center.
Lo and behold; a broken App Center (all environments, including local):

Sitecore's Cloud Status page happened to indicate that the App Center UI was "under maintenance" at the time.

 |
| Wow - month-long maintenance windows. Must be nice. |
Two days later - after much anticipation - an update was posted:

In addition to this status page update, the Sitecore documentation was updated to reflect the updated Sitecore Support Portal approach for activating the Geo IP Service:
 |
| Gotta love that freshly updated documentation scent. |
Okay, cool. I think that makes things a bit easier going forward.
But what about the Sitecore App Center Applications shortcuts in the Launchpad and Start Menu?


A quick search targeting the Core DB revealed those item definitions.

The specific items that control the shortcuts are:
LaunchPad
Name: AppCenter
ID: {F7F3379C-A034-4CE4-B2F7-9BDFC3F05A2B}
Template: LaunchPad-Button
Path: /sitecore/client/Applications/Launchpad/PageSettings/Buttons/Tools/AppCenter
ID: {F7F3379C-A034-4CE4-B2F7-9BDFC3F05A2B}
Template: LaunchPad-Button
Path: /sitecore/client/Applications/Launchpad/PageSettings/Buttons/Tools/AppCenter
For this shortcut, you have a few options:
1) Delete it
2) Move it outside of the Tools folder and into the PageSettings folder
3) Edit the Link field to point to the permanent Sitecore Cloud Status Page related to this event
I prefer option 3 because it could at least potentially help guide future devs or marketers in the right direction when activating the GeoIP service - specifically if it had always remained off.
Start Menu
Name: Sitecore App Center
ID: {A59E3738-08E1-49EA-9199-E0140F56C67D}
Template: Application shortcut
Path: /sitecore/content/Documents and settings/All users/Start menu/Left/Sitecore App Center
This Application Shortcut item is better off removed or disabled, rather than repurposed. Attempting to load an external link won't work with this template type (or any of the other applicable template types for this location).ID: {A59E3738-08E1-49EA-9199-E0140F56C67D}
Template: Application shortcut
Path: /sitecore/content/Documents and settings/All users/Start menu/Left/Sitecore App Center
To disable the shortcut, clear out the Application field.

👍
Script
If you don't want to do this manually - or you're strapped for time - you can, you know..just run this PowerShell script 😉:The script disables the Start Menu shortcut, then gives the option to repurpose or disable the Launchpad shortcut:

Thursday, January 23, 2020
Reviving the Screenshots Ribbon Button in Sitecore using ScreenshotLayer API and PowerShell

Have you noticed that the Screenshots button has been removed in 9.3?

I guess it's not that surprising since I don't remember any point in time where it actually functioned.
It's always gone something like this;
Click the Screenshots button:
 |
| The Screenshots button. So familiar yet so foreign to me |
Get a message stating you need to purchase the "relevant service".
Click Open
 |
| I never pass up a chance to open the Sitecore App Center |
 |
| Great. |
You may be asking, why don't the content authors just use an extension or some other tool?
 |
| Or, you know, the built-in capabilities of any Chromium-based browser. |
🤷♂️
The request called for consistent, full-page screenshot capabilities in Sitecore.
I thought that seemed pretty do-able.
Ever hear of ScreenshotLayer?
What's ScreenshotLayer?
It's a highly reliable REST API service that produces screenshots.Screenshotlayer is a lightweight REST API built to deliver high quality PNG, JPEG & GIF website screenshots at unparalleled speeds and through a simple interface.While I was researching and proving this out, I found that using open source libraries like Freezer often returned inconsistent results. I landed on ScreenshotsLayer given the ease of integration. Basically; feed it a URL and some parameters, and you get a high-quality screenshot back.
The service is free up to 100 screenshots per month, with a reasonably priced subscription model otherwise. https://screenshotlayer.com/product
Limitations
- CM needs to be accessible on the web without IP restrictions for API to consume. This won't work locally.- Added cost: Depending on the number of screenshots taken per month, you'll hit the free 100 screenshots quick. A Basic Plan subscription - which accounts for 10,000 screenshots per month should suffice in most cases. This doesn't seem out of the ordinary considering there used to be a service you'd have to sign-up for any way.
Goal
Our goal is to add a new Content Editor Ribbon button called 'Screenshots' in the same location that the old button once sat. If you're running Sitecore 9.2 or below, you'll want to manually remove or deny read access to the existing Screenshots button in the Core database.
The Script
The script should initially get the selected item, assert that the item has a layout, and get the item's URL. (The Get-ItemUrl function may need to be customized further for your own needs)
User Input
Let's assume a content author should make a simple selection for their screenshot; Mobile or Desktop. We can show a simple dialog with two buttons; Mobile or Desktop.
Upon selecting Mobile, we'll simply set a variable. If we have a Page URL, we'll call our Get-Screenshot function and pass in the URL and screenshot size as parameters:
 |
| Simple, yet effective. |
Upon selecting Mobile, we'll simply set a variable. If we have a Page URL, we'll call our Get-Screenshot function and pass in the URL and screenshot size as parameters:
Preparing the API Query
The API expects some common parameters defined in the URL query parameters, specifically, the API key, page URL, and viewport. We can concatenate all of our options and append it to the API URL endpoint.Consuming the API
We can now execute a WebRequest to the API and cast our result to an image stream.
Saving and Downloading the Image
With an image in the memory stream, we'll need to temporarily store the image as a physical file on the file system. In our approach, we'll utilize the $SitecoreDataFolder variable and create a 'screenshots' folder within it. We'll build some conditions to check for the presence of this location. Once the image has been saved, we'll invoke the Download-File function
Putting it All Together
SPE Integration
Creating a New Module
Right-click on the Script Library folder and select Module Wizard
We'll name our module Screenshots and select Content Editor - Ribbon as our integration point:

You'll end up with a new module folder and several items:


First thing's first....set an icon in the appearance section (you know about sitecoreicons.com, right? 😉)

Now, let's make sure from an integration standpoint, the Screenshots button is only displayed for items with a Layout present. We can easily accommodate this by editing the Show Rule in the Interactive section:
 |
| The Rules Engine makes this a no-brainer |
Finally, we can add our script to the Script body field of our item. Now would be a good time to make sure the $apiKey variable has been customized before saving.
Activating the New Module
In order for the system to pick up our new module and its corresponding integration points, we need to Sync the library. This can be achieved by opening a new ISE session and selecting the Sync Library Content Editor Ribbon sub-option of the Rebuild All button under the Settings tab:

We should now have a Screenshots button that displays in the Presentation > Preview chunk of the ribbon whenever an item with a layout is activated.
 |
| wo0t! |
Final Result

Starter Package
If you're looking to use or expand this functionality to fit your own requirements, you can feel free to download and install the Sitecore package from: https://github.com/strezag/Sitecore.SPE.Screenshots
Happy capturing! 📸


